6. 모노레포 고도화 (with Heft)
Heft로 중복 설정 제거하기
모노레포를 적용하기 위해 중복으로 작성했던 설정은 다음과 같습니다.
.eslintignore.eslintrc.js.prettierignore.prettierrc.json.jest.config.jstsconfig.json
지금처럼 프로젝트마다 중복으로 설정파일을 작성해도 작동은 하겠지만 영 찜찜합니다. Rush는 중복 설정의 문제를 해결하기 위해 Heft를 사용합니다.
Heft는 Rush Stack에 포함되어 있습니다. Rush Stack은 또 뭘까요? 이렇게 작은 게시판 프로젝트에서도 중복 설정 문제가 발생하는걸 보면, 프로젝트가 커질수록 모노레포 상황에서 발생하게 되는 문제들을 마주칠 것 같은 불안한 기분이 듭니다. Rush Stack은 대규모 모노레포 프로젝트를 관리할 때 마주치게 되는 문제를 해결할 수 있는 도구 모음집니다: https://rushstack.io/#what-is-rush-stack
Heft에서는 설정 파일의 중복을 ‘rig packages’로 해결합니다. 일단 Heft부터 설치해서 사용해볼까요?
~/nodejs-tutorial-example-rush$ cd app/board-cli
~/nodejs-tutorial-example-rush/app/board-cli$ rush add -p @rushstack/heft --dev --caret
Heft를 명령줄에서도 실행할 수 있게 --global로 설치도 해줍니다.
~/nodejs-tutorial-example-rush/app/board-cli$ pnpm install --global @rushstack/heft
그리고 app/board-cli에서 heft build로 빌드가 잘 되는지 테스트합니다.
~/nodejs-tutorial-example-rush/app/board-cli$ heft build

...
[typescript] Using TypeScript version 4.6.3
[eslint] Using ESLint version 8.12.0
 ---- Compile finished (3452ms) ----
 ---- Bundle started ----
 ---- Bundle finished (1ms) ----
 ---- Post-build started ----
 ---- Post-build finished (0ms) ----
-------------------- Finished (3.802s) --------------------
Project: app-board-cli@1.0.0
Heft version: 0.44.5
Node version: v14.19.1

~/nodejs-tutorial-example-rush/app/board-cli$ rushx start
1) 목록 조회
2) 쓰기
x) 종료

선택:
~/nodejs-tutorial-example-rush/app/board-cli$ echo 'temp/' >> ../../.gitignore
빌드가 잘 되는군요. 실행도 잘 됩니다. temp 디렉토리도 생성되는데 저장소에 추가할 필요는 없으니 .gitignore에 temp/를 추가합니다.
방금은 package.json의 build 스크립트를 사용하지 않고 빌드를 했습니다. package.json에서 build 스크립트를 삭제하고 다시
heft build를 입력해도 동일하게 빌드가 잘 되는 것을 확인할 수 있습니다. heft build를 실행하면 Heft가 .eslintrc와 tsconfig.json를
보고 알아서 lint를 수행하고 컴파일을 합니다. 우리가 원하는 빌드 과정은
prettier로 코드 스타일 정리eslint로 규칙에 어긋나는 코드가 있는지 확인typescript로 컴파일
하는 것입니다. 운이 좋게 2번과 3번은 Heft가 알아서 해주지만 prettier는 추가로 설정해야 합니다. 그리고 위 3개의 과정과 관련된 모든 설정파일도 여전히
프로젝트별로 존재하고 있습니다. 일단
메뉴얼을 따라서 package.json의 build 스크립트에서 heft build --clean을 실행하도록 변경합니다.
// app/board-cli/package.json과 domain/board-domain/package.json 모두 동일하게 변경
{
  ...,
  "scripts": {
    "build": "heft build --clean"
  },
  ...
}
그리고 최종 빌드 결과물이 실행이 잘 되는지 확인합니다.
~/nodejs-tutorial-example-rush/app/board-cli$ cd ../../
~/nodejs-tutorial-example-rush$ rush build && rush deploy --overwrite

...
Deleting target folder contents because "--overwrite" was specified...

Analyzing project: app-board-cli

Copying folders...
Writing deploy-metadata.json
Creating symlinks...

The operation completed successfully.
~/nodejs-tutorial-example-rush$ node common/deploy/app/board-cli
1) 목록 조회
2) 쓰기
x) 종료

선택:
Heft로 빌드를 수행하더라도 빌드 결과물이 제대로 나옵니다. Rush와 Heft가 잘 맞물려서 작동하는 것도 확인했습니다. 이제는 중복된 설정 파일을 제거할 차례입니다.
rig package로 tsconfig.json 중복 없애기
Heft는 ‘rig packages’라는 설정용 프로젝트를 도입해서 설정 파일의 중복을 없앱니다.
tsconfig.json이나 .eslintrc같이 IDE에서도 사용해야 하는 설정파일의 경우는 개별 프로젝트 디렉토리에서 이 파일들을 완전히 없앨 수는 없지만,
jest.config.json는 ‘rig packages’를 도입해서 완전히 없앨 수 있습니다.
core-rig라는 우리만의 rig package를 만들어서 사용해봅시다. rig/core-rig라는 디렉토리를 만들고 rush.json의 projects 속성에 추가합니다.
~/nodejs-tutorial-example-rush$ mkdir -p rig/core-rig && cd rig/core-rig
~/nodejs-tutorial-example-rush/rig/core-rig$ npm init # package.json 생성. 계속 엔터만 눌러줍니다.
생성한 package.json을 열어서 build와 clean 스크립트를 추가합니다. 없으면 rush 커맨드 실행시 에러가 발생하기 때문에 빈 문자열만 넣어줍니다.
// rig/core-rig/package.json
{
  "name": "core-rig",
  "version": "1.0.0",
  "description": "",
  "main": "index.js",
  "author": "",
  "scripts": {
    "build": "",
    "clean": ""
  },
  "license": "ISC"
}
rush.json에 프로젝트를 추가합니다.
// rush.json
{
  ...,
  "projects": [
    {
      "packageName": "app-board-cli",
      "projectFolder": "app/board-cli"
    },
    {
      "packageName": "board-domain",
      "projectFolder": "domain/board-domain"
    },
    {
      "packageName": "core-rig",
      "projectFolder": "rig/core-rig"
    }
  ]
}
다시 프로젝트 root으로 돌아와서 rush update를 합니다.
~/nodejs-tutorial-example-rush/rig/core-rig$ cd ../../
~/nodejs-tutorial-example-rush$ rush update

...
Rush update finished successfully. (1.82 seconds)
우리는 이전에 domain/board-domain 프로젝트를 추가하면서 tsconfig.json에 declaration과 declarationMap 옵션을 켜주었습니다.
tsconfig.json 옵션을 rig/core-rig 프로젝트로 옮기더라도 domain/board-domain빌드 결과물에 .d.ts와 .d.ts.map이 생성된다면
tsconfig.json 설정이 잘 적용됐다는 것을 증명할 수 있습니다.
doamin/board-domain으로 이동해서 core-rig 의존성을 추가합니다.
~/nodejs-tutorial-example-rush$ cd domain/board-domain
~/nodejs-tutorial-example-rush/domain/board-domain$ rush add -p core-rig
~/nodejs-tutorial-example-rush/domain/board-domain$ cat package.json
{
  ...,
  "dependencies": {
    "core-rig": "workspace:*"
  }
}
~/nodejs-tutorial-example-rush/domain/board-domain$ ls -al node_modules | grep core-rig
lrwxr-xr-x  21 mj  4 Apr 21:47 core-rig -> ../../../rig/core-rig
core-rig 의존성이 추가되었고 rig/core-rig 디렉토리를 가리키는 것을 확인할 수 있습니다. domain/board-domain/tsconfig.json을
rig/core-rig/tsconfig.json으로 복사합니다.
~/nodejs-tutorial-example-rush/domain/board-domain$ cp tsconfig.json ../../rig/core-rig
그리고 domain/board-domain/tsconfig.json이 rig/core-rig의 tsconfig.json을 상속하도록 변경합니다.
// domain/board-domain/tsconfig.json
{
  "extends": "./node_modules/core-rig/tsconfig.json"
}
마지막으로 domain/board-domain/config/rig.json을 추가합니다. rigPackageName은 core-rig입니다.
// The "rig.json" file directs tools to look for their config files in an external package.
// Documentation for this system: https://www.npmjs.com/package/@rushstack/rig-package
{
  "$schema": "https://developer.microsoft.com/json-schemas/rig-package/rig.schema.json",

  /**
   * (Required) The name of the rig package to inherit from.
   * It should be an NPM package name with the "-rig" suffix.
   */
  "rigPackageName": "core-rig"

  /**
   * (Optional) Selects a config profile from the rig package.  The name must consist of
   * lowercase alphanumeric words separated by hyphens, for example "sample-profile".
   * If omitted, then the "default" profile will be used."
   */
  // "rigProfile": "your-profile-name"
}
dist 디렉토리를 제거하고 다시 빌드를 합니다.
~/nodejs-tutorial-example-rush/domain/board-domain$ rm -rf dist && rush build

--[ FAILURE: board-domain ]----------------------------------[ 0.54 seconds ]--

Error: The rig profile "default" is not defined by the rig package "core-rig"


Operations failed.

rush build (0.57 seconds)
default profile이 core-rig에 없다고 에러가 발생합니다.
rig pakcage의 예시를 보면 tsconfig-base.json이 profiles/default 디렉토리 안에 있는 것을 확인할 수 있습니다.
저희도 동일하게 rig/core-rig/tsconfig.json을 rig/core-rig/profiles/default 이하로 옮겨주고 다시 빌드를 합니다.
~/nodejs-tutorial-example-rush/domain/board-domain$ cd ../../rig/core-rig
~/nodejs-tutorial-example-rush/rig/core-rig$ mkdir -p profiles/default && mv tsconfig.json profiles/default
~/nodejs-tutorial-example-rush/rig/core-rig$ rush build

...
  [typescript] src/article/view/cli/MenuPrinter.ts:2:33 - (TS2307) Cannot find module 'board-domain/dist/article/port/incoming/ArticleResponse' or its corresponding type declarations.
Error: Encountered TypeScript errors


Operations failed.

rush build (7.94 seconds)
이번에도 실패합니다. rig package 설정까지는 잘 된 것 같은데 app/board-cli를 컴파일 할 때 domain/board-domain의 코드를 찾지 못합니다.
디렉토리를 확인해보니 domain/board-domain/dist가 생성되어 있지 않습니다. domain/board-domain 프로젝트의 빌드는 성공했는데 빌드 결과물은
어디에 있는걸까요? 두구두구… rig/core-rig/profiles/default/dist에 있습니다.
rig/core-rig/profiles/default/tsconfig.json에 "outDir": "./dist"로 옵션이 들어가있어서 이를 상속하는
domain/board-domain/tsconfig.json의 빌드 결과물이 rig/core-rig/profiles/default/dist로 가버린 것이었습니다."outDir"과
"rootDir" 속성은 core-rig의 tsconfig.json에 있을 필요가 없으니 지워주고 domain/board-domain/tsconfig.json에 추가해줍니다.
// domain/board-domain/tsconfig.json
{
  "extends": "./node_modules/core-rig/profiles/default/tsconfig.json",
  "compilerOptions": {
    "outDir": "./dist",
    "rootDir": "./src",
  }
}
오랜만에 rush clean을 하고 rush build를 실행합니다.
~/nodejs-tutorial-example-rush/rig/core-rig$ rush clean && rush build

...
==[ SUCCESS: 2 operations ]====================================================

These operations completed successfully:
  app-board-cli    4.27 seconds
  board-domain     3.13 seconds


rush build (7.42 seconds)
빌드가 잘 되네요. domain/board-domain/dist를 확인해보면 .d.ts와 .d.ts.map 파일을 확인할 수 있습니다. 이로써 core-rig의
tsconfig.json의 설정이 domain/board-domain의 컴파일에 영향을 주고 있음을 알 수 있습니다.
~/nodejs-tutorial-example-rush/rig/core-rig$ tree ../../domain/board-domain/dist -P '*.d.ts|*.d.ts.map' -I __test__
../../domain/board-domain/dist
└── article
    ├── ArticleCommandService.d.ts
    ├── ArticleCommandService.d.ts.map
    ├── ArticleQueryService.d.ts
    ├── ArticleQueryService.d.ts.map
    ├── model
    │   ├── Article.d.ts
    │   ├── Article.d.ts.map
    │   ├── ArticleImpl.d.ts
    │   └── ArticleImpl.d.ts.map
    └── port
        ├── incoming
        │   ├── ArticleCreateUseCase.d.ts
        │   ├── ArticleCreateUseCase.d.ts.map
        │   ├── ArticleGetUseCase.d.ts
        │   ├── ArticleGetUseCase.d.ts.map
        │   ├── ArticleListUseCase.d.ts
        │   ├── ArticleListUseCase.d.ts.map
        │   ├── ArticleRequest.d.ts
        │   ├── ArticleRequest.d.ts.map
        │   ├── ArticleResponse.d.ts
        │   └── ArticleResponse.d.ts.map
        └── outgoing
            ├── ArticleLoadPort.d.ts
            ├── ArticleLoadPort.d.ts.map
            ├── ArticleSavePort.d.ts
            └── ArticleSavePort.d.ts.map

5 directories, 22 files
app/board-cli에서도 rig/core-rig를 의존하고 tsconfig.json의 중복을 없앱니다.
~/nodejs-tutorial-example-rush/rig/core-rig$ cd ../../app/board-cli
~/nodejs-tutorial-example-rush/app/board-cli$ rush add -p core-rig
// app/board-cli/tsconfig.json
{
  "extends": "./node_modules/core-rig/profiles/default/tsconfig.json",
  "compilerOptions": {
    "outDir": "./dist",
    "rootDir": "./src"
  }
}
다시 빌드하고 실행까지 잘 되는지 확인합니다.
~/nodejs-tutorial-example-rush/app/board-cli$ rush clean && rush rebuild && rushx start
1) 목록 조회
2) 쓰기
x) 종료

선택:
아래 설정파일들 중에서 tsconfig.json의 중복을 해결했습니다.
.eslintignore.eslintrc.js.prettierignore.prettierrc.json.jest.config.jstsconfig.json
다음은 .eslintrc.js와 .eslitignore 차례입니다.
지금까지 작성한 코드는 nodejs-tutorial-example:chapter-6-rig에서 확인할 수 있습니다.
.eslintrc.js 중복 없애기
Rush Stack에서는 .eslintrc.js에 대해서 아래와 같이 말하고 있습니다.
모노레포의 root 폴더에 중앙화된
.eslintrc.js파일을 놓기를 추천하지 않는다. 이는 프로젝트들이 독립적이어야 하고 모노레포간에 프로젝트들을 옮기기 쉬워야 한다는 Rush의 원칙과 맞지 않는다.It’s not recommended to place a centralized .eslintrc.js in the monorepo root folder. This violates Rush’s principle that projects should be independent and easily movable between monorepos.
그리고 이어지는 코드를 보면 tsconfig.json과 마찬가지로 rig package에 설정을 보관하고 개별 프로젝트의 .eslintrc에서 상속해서 사용합니다.
// This is a workaround for https://github.com/eslint/eslint/issues/3458
require('@rushstack/eslint-config/patch/modern-module-resolution');

module.exports = {
  extends: ['@rushstack/eslint-config/profile/node'],
  parserOptions: { tsconfigRootDir: __dirname }
};
저희도 동일하게 해보겠습니다. .eslintrc.js를 core-rig 프로젝트로 옮기고 app/board-cli와 domain/board-domain 프로젝트에
@rushstack/eslint-config를 개발 의존성으로 추가합니다 (위 코드의 require 부분을 사용하기 위함).
~/nodejs-tutorial-example-rush/app/board-cli$ cp .eslintrc.js ../../rig/core-rig/profiles/default/
~/nodejs-tutorial-example-rush/app/board-cli$ rush add -p @rushstack/eslint-config --dev --caret
~/nodejs-tutorial-example-rush/app/board-cli$ cd ../../domain/board-domain
~/nodejs-tutorial-example-rush/domain/board-domain$ rush add -p @rushstack/eslint-config --dev --caret
그리고 rig/core-rig 프로젝트에 eslint 관련 의존성을 개발 의존성으로 설치합니다.
~/nodejs-tutorial-example-rush/domain/board-domain$ cd ../../rig/core-rig
~/nodejs-tutorial-example-rush/rig/core-rig$ rush add -p @typescript-eslint/eslint-plugin -p @typescript-eslint/parser -p typescript -p eslint -p eslint-config-prettier --dev --caret
app/board-cli/.eslintrc.js와 domain/board-domain/.eslintrc.js를 아래처럼 변경합니다.
// This is a workaround for https://github.com/eslint/eslint/issues/3458
require('@rushstack/eslint-config/patch/modern-module-resolution');

module.exports = {
  extends: ['core-rig/profiles/default/.eslintrc'],
  parserOptions: { tsconfigRootDir: __dirname }
};
app/board-cli/index.ts에서 eslint 규칙을 위배해보겠습니다.
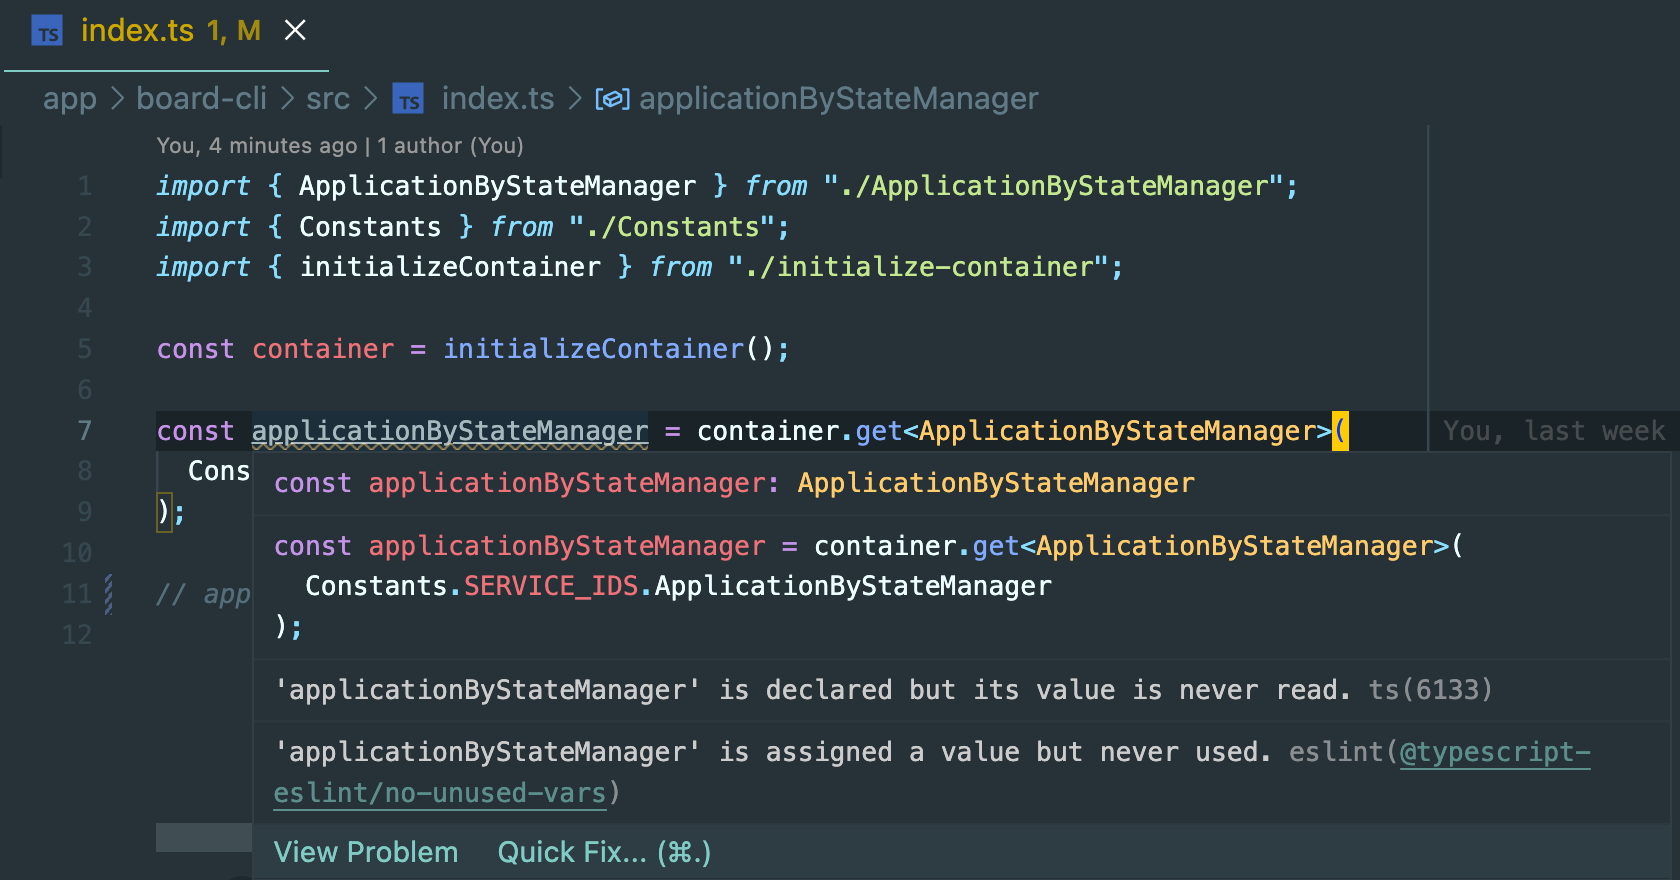
~/nodejs-tutorial-example-rush/domain/board-domain$ cd ../../app/board-cli
~/nodejs-tutorial-example-rush/app/board-cli$ rushx lint

...
Rush Multi-Project Build Tool 5.64.0 - Node.js 14.19.1 (LTS)
> "eslint . --ext .ts,.tsx"


/Users/mj/projects/nodejs-tutorial-example-rush/app/board-cli/src/index.ts
  7:7  warning  'applicationByStateManager' is assigned a value but never used  @typescript-eslint/no-unused-vars

✖ 1 problem (0 errors, 1 warning)
작동이 잘 됩니다. .eslintignore는 root으로 올려줍니다.
~/nodejs-tutorial-example-rush/app/board-cli$ mv .eslintignore ../../
~/nodejs-tutorial-example-rush/app/board-cli$ rm ../../domain/board-domain/.eslintignore
Rush Stack 문서의 Riggable Dependencies 항목을 보면
typescript와 eslint 의존성은 rig package로 제공할 수 있다고 합니다.
The rig package can also provide NPM dependencies, to avoid having to specify them as “devDependencies” for your project. The following tool packages can be provided by the rig:
- typescript
- @microsoft/api-extractor
- eslint
- tslint
Today, only these packages can be provided via a rig. Providing dependencies via a rig is optional. Your local project’s devDependencies take precedence over the rig.
typescript, eslint, @typescript-eslint/eslint-plugin, @typescript-eslint/parser, eslint-config-prettier
이 5개의 의존성은 app/board-cli, domain/board-domain, rig/core-rig 3개의 프로젝트에서 모두 의존하고 있습니다. rig package에만
남겨놔도 될 것 같으니 app/board-cli, domain/board-domain에서 위 의존성들을 제거합니다.
typescript, eslint는 rig/core-rig/package.json에서 devDependencies가 아니라 dependencies에 있어야 합니다.
Heft resolves each riggable tool independently, using the following procedure:
- If the tool package is listed in the devDependencies for the local project, then the tool is resolved from the current project folder. (This step does NOT consider dependencies or peerDependencies.)
- OTHERWISE, if the current project has a rig.json file, and if the rig’s package.json lists the tool in its dependencies, then the tool is resolved from the rig package folder. (This step does NOT consider devDependencies or peerDependencies.)
- OTHERWISE, the tool is resolved from the current project folder. If it can’t be found there, then an error is reported.
의존성을 제거하는 rush remove같은 커맨드는 아직 없습니다.
app/board-cli/pakcage.json, domain/board-domain/package.json에서 수동으로 의존성을 제거하고 rig/coer-rig/package.json에서
typescript와 eslint를 dependencies로 옮긴 뒤 rush update를 입력하면…
~/nodejs-tutorial-example-rush/app/board-cli$ rush update
...
 ERR_PNPM_PEER_DEP_ISSUES  Unmet peer dependencies

../../app/board-cli
├─┬ ts-jest
│ └── ✕ missing peer typescript@">=3.8 <5.0"
├─┬ ts-node
│ └── ✕ missing peer typescript@>=2.7
└─┬ @rushstack/eslint-config
  ├── ✕ missing peer typescript@>=3.0.0
  ├── ✕ missing peer eslint@"^6.0.0 || ^7.0.0 || ^8.0.0"
...
pnpm의 강력한 peer dependency 정책때문에 잘 안됩니다. ts-jest와 ts-node에서 typescript를 필요로 하는군요. 어쩔 수 없이
typescript는 다시 추가하고, @rushstack/eslint-config는 eslint를 필요로 하기때문에 eslint도 다시 추가합니다.
@typescript-eslint/eslint-plugin, @typescript-eslint/parser는 app/board-cli와 domain/board-domain에서 직접 사용하는게
아니라 .eslintrc.js에서 사용하기 때문에 이 둘은 rig/core-rig/package.json에만 남겨도 됩니다.
PNPM때문에 문서에 나와있는 것과는 달리 typescript와 eslint를 rig package로 옮기진 못했지만 @typescript-eslint/eslint-plugin,
@typescript-eslint/parser는 rig/core-rig에서만 의존하고 나머지 프로젝트에서는 제거했습니다. 뭔가 많이 바꿨으니 rush update --full을
하고 빌드와 배포까지 잘 되는지 확인합니다.
~/nodejs-tutorial-example-rush/app/board-cli$ rush update --full --purge && rush build && rush deploy --overwrite
...
The operation completed successfully.
~/nodejs-tutorial-example-rush/app/board-cli$ cd../../
~/nodejs-tutorial-example-rush$ node common/deploy/app/board-cli
1) 목록 조회
2) 쓰기
x) 종료

선택:
실행이 잘 됩니다.
.eslintignore.eslintrc.js.prettierignore.prettierrc.json.jest.config.jstsconfig.json
이제 prettier와 jest 설정의 중복만 없애면 됩니다.
지금까지 작성한 코드는 nodejs-tutorial-example:chapter-6-remove-eslintrc-dup에서 확인할 수 있습니다.
prettierrc.json 중복 없애기
Rush Stack에서는 Prettier에 대해서 아래와 같이 말하고 있습니다.
Prettier: This tool manages trivial syntax aspects such as spaces, commas, and semicolons. Because these aspects normally don’t affect code semantics, we never bother the developer with error messages about it, nor is it part of the build. Instead, Prettier reformats the code automatically via a git commit hook. To se this up, see the Enabling Prettier tutorial on the Rush website.
요약하자면, Prettier는 코드의 의미(semantics)에 영향을 주지 않으니 git의 commit hook 정도로만 사용해도 충분하다고 합니다. commit hook에서
수행하는 작업은 최대한 빨라야 합니다. 만약 commit을 할 때마다 10초씩 걸리게 된다면 커밋 한 번 한 번이 부담스럽고 커밋 하나 하나의 덩치가
커지게 됩니다. 작은 단위로 커밋을 하게되면 커밋 히스토리만으로도 작업자의 의도를 알 수 있고 커밋당 변경사항도 많지 않아 코드 리뷰때도 편합니다.
pretty-quick 패키지는 변경이 있는 파일에 대해서만 Prettier를 실행하기 때문에 속도가 빨라서 Rush에서도 사용을 권장하고 있습니다.
Enabling Prettier 가이드를 따라서 진행해보겠습니다. 일단
.prettierrc.json과 .prettierignore를 프로젝트 root로 옮깁니다.
~/nodejs-tutorial-example-rush$ mv app/board-cli/.prettierrc.json app/board-cli/.prettierignore .
~/nodejs-tutorial-example-rush$ rm domain/board-domain/.prettierrc.json domain/board-domain/.prettierignore
프로젝트를 세팅할 때 commit hook을 자동으로 설정하도록 rush init-autoinstaller
를 사용해서 common/autoinstallers/rush-prettier/package.json 파일을 생성합니다.
~/nodejs-tutorial-example-rush$ rush init-autoinstaller --name rush-prettier

Starting "rush init-autoinstaller"

Creating package: /Users/mj/projects/nodejs-tutorial-example-rush/common/autoinstallers/rush-prettier/package.json

File successfully written. Add your dependencies before committing.
common/autoinstallers/rush-prettier로 이동해서 prettier와 pretty-quick 의존성을 추가하고 autoinstaller를 업데이트합니다.
~/nodejs-tutorial-example-rush$ cd common/autoinstallers/rush-prettier
~/nodejs-tutorial-example-rush/common/autoinstallers/rush-prettier$ pnpm install prettier pretty-quick
...
dependencies:
+ prettier 2.6.2
+ pretty-quick 3.1.3

~/nodejs-tutorial-example-rush/common/autoinstallers/rush-prettier$ rush update-autoinstaller --name rush-prettier
지금까지의 변경사항은 아래와 같습니다. 모두 추가하고 커밋합니다.
~/nodejs-tutorial-example-rush/common/autoinstallers/rush-prettier$ git status                                                                                                         ─╯
On branch main
Your branch is up to date with 'origin/main'.

Changes not staged for commit:
  (use "git add/rm <file>..." to update what will be committed)
  (use "git restore <file>..." to discard changes in working directory)
        deleted:    ../../../app/board-cli/.prettierignore
        deleted:    ../../../app/board-cli/.prettierrc.json
        deleted:    ../../../domain/board-domain/.prettierignore
        deleted:    ../../../domain/board-domain/.prettierrc.json

Untracked files:
  (use "git add <file>..." to include in what will be committed)
        ../../../.prettierignore
        ../../../.prettierrc.json
        ../

no changes added to commit (use "git add" and/or "git commit -a")
~/nodejs-tutorial-example-rush/common/autoinstallers/rush-prettier$ cd ../../../
~/nodejs-tutorial-example-rush$ git add .
~/nodejs-tutorial-example-rush$ git commit
그리고 이전에 rush clean 커맨드를 추가했던
것처럼 rush prettier 커맨드를 추가합니다. 이번에 commandKind는 global입니다.
// common/config/rush/command-line.json
{
  "commands": [
    ...,
    {
      "name": "prettier",
      "commandKind": "global",
      "summary": "Used by the pre-commit Git hook. This command invokes Prettier to reformat staged changes.",
      "safeForSimultaneousRushProcesses": true,

      "autoinstallerName": "rush-prettier",

      // This will invoke common/autoinstallers/rush-prettier/node_modules/.bin/pretty-quick
      "shellCommand": "pretty-quick --staged"
    }
  ]
}
커맨드를 추가했으니 rush prettier를 입력합니다. 두 번 입력합니다.
~/nodejs-tutorial-example-rush$ rush prettier # 첫 번째
...

dependencies:
+ prettier 2.6.2
+ pretty-quick 3.1.3
Auto install completed successfully

🔍  Finding changed files since git revision 55aae42.
🎯  Found 0 changed files.
✅  Everything is awesome!
~/nodejs-tutorial-example-rush$ rush prettier # 두 번째
...

Autoinstaller folder is already up to date

🔍  Finding changed files since git revision 55aae42.
🎯  Found 0 changed files.
✅  Everything is awesome!
첫 번째 실행해서는 관련 의존성을 설치하고 pretty-quick --staged를 실행했습니다. 두 번째 실행에서는 이미 의존성이 설치되어 있으므로
pretty-quick --staged를 실행했습니다. 최신 커밋과 비교해서 변경된 파일에만 Prettier를 적용하는 것을 알 수 있네요. .ts파일을 무작위로 선택해서
변경한 뒤 git add로 파일을 추가하고 rush prettier를 실행하면 Prettier가 파일을 검사하고 변경합니다.
# app/board-cli/src/index.ts를 변경하고 rush prettier를 실행
~/nodejs-tutorial-example-rush$ rush prettier
...

Autoinstaller folder is already up to date

🔍  Finding changed files since git revision 55aae42.
🎯  Found 3 changed files.
✍️  Fixing up app/board-cli/src/index.ts.
✅  Everything is awesome!
마지막으로 common/git-hooks/pre-commit 파일을 생성해서 아래 내용을 붙여넣어줍니다.
#!/bin/sh
# Called by "git commit" with no arguments.  The hook should
# exit with non-zero status after issuing an appropriate message if
# it wants to stop the commit.

# Invoke the "rush prettier" custom command to reformat files whenever they
# are committed. The command is defined in common/config/rush/command-line.json
# and uses the "rush-prettier" autoinstaller.
node common/scripts/install-run-rush.js prettier || exit $?
rush install을 입력해서 commit hook을 등록합니다. .git/hooks/pre-commit 파일이 위 내용으로 잘 생성됐는지 확인합니다.
~/nodejs-tutorial-example-rush$ rush install # autoinstaller가 hook을 설치한다.
...
Rush install finished successfully. (2.00 seconds)

~/nodejs-tutorial-example-rush$ cat .git/hooks/pre-commit # 설치한 pre-commit hook 확인
#!/bin/sh
# Called by "git commit" with no arguments.  The hook should
# exit with non-zero status after issuing an appropriate message if
# it wants to stop the commit.

# Invoke the "rush prettier" custom command to reformat files whenever they
# are committed. The command is defined in common/config/rush/command-line.json
# and uses the "rush-prettier" autoinstaller.
node common/scripts/install-run-rush.js prettier || exit $?
git hook은 .git/hooks에 넣어야 동작하는데, .git 디렉토리는 git 자체에 대한 디렉토리라 이 디렉토리를 git으로 관리할 수는 없습니다.
그래서 Rush는 autoinstaller를 사용하는 방법으로 모든 개발자가 pre-commit hook을 사용할 수 있도록 자동화했습니다. 다른 방법으로는 git이
사용하는 hook 디렉토리를 .git/hooks가 아니라 .git 디렉토리 바깥으로 변경하는 방법이 있는데, 어쨌든 git clone을 한 뒤에 특정한 작업을
수행해줘야 한다는 점은 변하지 않습니다.
※ 저는 Prettier - Code formatter VSCode 플러그인으로 VSCode에서 파일을 저장할 때마다 해당 파일에 대해서 자동으로 Prettier를 실행하도록 했습니다.
// .vscode/settings.json
{
  "editor.defaultFormatter": "esbenp.prettier-vscode",
  "editor.formatOnSave": true,
  "editor.codeActionsOnSave": {
    "source.fixAll": true,
    "source.fixAll.eslint": true
  },
  ...
}
지금까지 작성한 코드는 nodejs-tutorial-example:chapter-6-remove-jest-dup에서 확인할 수 있습니다.
.eslintignore.eslintrc.js.prettierignore.prettierrc.json.jest.config.jstsconfig.json
이제 jest.config.js만 남았군요.
jest.config.js 중복 없애기
Jest의 경우는 약간 복잡합니다. 타입스크립트와 Jest를 함께 사용하는 방법은 babel-jest를 사용하거나 ts-jest를 사용하는 방법이 있습니다.
그러나 babel-jest와 ts-jest가 모두 마음에 들지 않았던 Heft팀은 heft-jest를 만들었습니다.
heft-jest는 기존의 Jest가 mocking하는 방식에서 몇 가지 주의해야 할 점이 생기고, 이에 대해서 개발자가 실수하지 않도록 eslint plugin을
만들어서 제공합니다. 제가 말씀드린 내용 모두 “jest” task 문서에 자세하게 나와있습니다.
“Riggable” config files는 개별 프로젝트에 설정 파일이
없을 때 rig package의 config의 설정을 참고하게 되는 파일들입니다. jest.config.json도 riggable config이므로 설정 파일을 rig package로
옮겨서 중복을 제거할 수 있습니다.
문서를 따라서 설정해보겠습니다.
rig/core-rig 프로젝트에 @rushstack/heft, @rushstack/heft-jest-plugin, @types/heft-jest 의존성을 설치합니다.
@types/heft-jest는 테스트가 있는 모든 모듈, 그러니까 app/board-cli, domain/board-domain에도 설치해야 합니다.
~/nodejs-tutorial-example-rush$ cd rig/core-rig
~/nodejs-tutorial-example-rush/rig/core-rig$ rush add -p @rushstack/heft -p @rushstack/heft-jest-plugin --caret --dev
~/nodejs-tutorial-example-rush/rig/core-rig$ rush add -p @types/heft-jest --exact --dev
~/nodejs-tutorial-example-rush/rig/core-rig$ cd ../../app/board-cli
~/nodejs-tutorial-example-rush/app/board-cli$ rush add -p @types/heft-jest --exact --dev
~/nodejs-tutorial-example-rush/app/board-cli$ cd ../../domain/board-domain
~/nodejs-tutorial-example-rush/domain/board-domain$ rush add -p @types/heft-jest --exact --dev
그리고 rig/core-rig/profiles/default/tsconfig.json의 types에 "node"와 "heft-jest"를 추가합니다. "sourceMap" 옵션도
켜줍니다. "sourceMap"은 컴파일 결과물에 .js.map 파일도 출력합니다. 이 파일이 있어야 heft-jest가 테스트를 수행할 수 있습니다.
{
  "compilerOptions": {
    ...,
    "types": ["node", "heft-jest"],
    "sourceMap": true,
    ...,
  }
}
프로젝트 root에 rig/core-rig/profiles/default/config/heft.json 파일을 아래와 같이 추가합니다.
// config/heft.json
{
  "$schema": "https://developer.microsoft.com/json-schemas/heft/heft.schema.json",
  "heftPlugins": [{ "plugin": "@rushstack/heft-jest-plugin" }]
}
rig/core-rig/profiles/default/config/jest.config.json 파일도 추가합니다.
// config/jest.config.json
{
  "extends": "@rushstack/heft-jest-plugin/includes/jest-shared.config.json",
  "collectCoverageFrom": ["src/**/*.{ts,tsx}", "!src/**/__test__/**"],
  "testPathIgnorePatterns": ["/node_modules/", "/dist/"]
}
이전에 추가했던 domain/board-domain/config/rig.json을 복사해서 app/board-cli/config/rig.json을 생성합니다.
~/nodejs-tutorial-example-rush/rig/core-rig$ cd ../../
~/nodejs-tutorial-example-rush$ mkdir app/board-cli/config
~/nodejs-tutorial-example-rush$ cp domain/board-domain/config/rig.json app/board-cli/config
더 이상 필요없어진 app/board-cli/jest.config.js, domain/board-domain/jest.config.js 파일을 제거하고 테스트를 실행합니다.
~/nodejs-tutorial-example-rush$ rm app/board-cli/jest.config.js domain/board-domain/jest.config.js
~/nodejs-tutorial-example-rush$ cd app/board-cli
~/nodejs-tutorial-example-rush/app/board-cli$ heft test
Project: app-board-cli@1.0.0
Heft version: 0.44.5
Node version: v14.19.1
Error: The transpiler output folder does not exist:
  /Users/mj/projects/nodejs-tutorial-example-rush/app/board-cli/lib
Was the compiler invoked? Is the "emitFolderNameForTests" setting correctly specified in config/typescript.json?
config/typescript.json 파일이 없다고 에러가 발생합니다. rig/core-rig/profiles/default/config/typescript.json 파일을 생성해
아래 내용을 넣어줍니다.
// rig/core-rig/profiles/default/config/typescript.json
{
  "$schema": "https://developer.microsoft.com/json-schemas/heft/typescript.schema.json",
  "emitFolderNameForTests": "./dist"
}
다시 heft test를 입력하면 테스트가 모두 성공합니다.
~/nodejs-tutorial-example-rush/app/board-cli$ heft test
...

Tests finished:
  Successes: 38
  Failures: 0
  Total: 38
 ---- Test finished (10772ms) ----
-------------------- Finished (14.993s) --------------------
Project: app-board-cli@1.0.0
Heft version: 0.44.5
Node version: v14.19.1
domain/board-domain 프로젝트에서도 테스트가 성공하는지 확인합니다.
~/nodejs-tutorial-example-rush/app/board-cli$ cd ../../domain/board-domain
~/nodejs-tutorial-example-rush/domain/board-domain$ heft test
...

Tests finished:
  Successes: 7
  Failures: 0
  Total: 7
 ---- Test finished (2620ms) ----
-------------------- Finished (6.316s) --------------------
Project: board-domain@1.0.0
Heft version: 0.44.5
Node version: v14.19.1
마찬가지로 모두 성공하는군요. 모든 프로젝트의 테스트를 한 번에 실행할 수 있는 rush test 커맨드를 추가합니다.
// common/config/rush/command-line.json
{
  ...,
  "commands": [
    ...,
    {
      "commandKind": "bulk",
      "name": "test",
      "summary": "Run tests of each project.",
      "description": "Run tests of each project.",
      "enableParallelism": true
    }
  ]
}
app/board-cli/package.json과 domain/board-domain/package.json의 "test" 스크립트를 "heft test --clean"으로 변경합니다.
rig/core-rig/package.json은 "test": ""로 입력합니다. rush test가 잘 되는지 확인합니다.
~/nodejs-tutorial-example-rush/domain/board-domain$ rush test
...

==[ SUCCESS: 2 operation ]=====================================================

These operations completed successfully:
  board-domain    5.31 seconds
  app-board-cli   7.98 seconds
잘 되는군요.
.eslintignore.eslintrc.js.prettierignore.prettierrc.json.jest.config.jstsconfig.json
모든 설정의 중복을 Rush Stack에서 권장하는 방식으로 제거했습니다 🎉🎊🎉⭐️🔥☀️🎉
권장 설정
빌드 과정에 테스트 포함하기
이전에 우리가 원하는 빌드 과정은 아래와 같다고 했습니다.
prettier로 코드 스타일 정리eslint로 규칙에 어긋나는 코드가 있는지 확인typescript로 컴파일
1번은 pre-commit hook으로 대체했고, 개별 프로젝트에서 heft build를 입력하면 eslint로 lint 과정을 수행한 뒤에 typescript로
컴파일을 해서 결과물을 dist 디렉토리에 생성합니다.
~/nodejs-tutorial-example-rush/domain/board-domain$ heft clean
~/nodejs-tutorial-example-rush/domain/board-domain$ heft build
Project build folder is ".../nodejs-tutorial-example-rush/domain/board-domain"
Using rig configuration from ./node_modules/core-rig/profiles/default
Starting build ---- Pre-compile started ----
 ---- Pre-compile finished (1ms) ----
 ---- Compile started ----
[typescript] The TypeScript compiler version 4.6.3 is newer than the latest version that was tested with Heft (4.5); it may not work correctly.
[typescript] Using TypeScript version 4.6.3
[eslint] Using ESLint version 8.12.0
 ---- Compile finished (3267ms) ----
 ---- Bundle started ----
 ---- Bundle finished (1ms) ----
 ---- Post-build started ----
 ---- Post-build finished (2ms) ----
-------------------- Finished (3.952s) --------------------
Project: board-domain@1.0.0
Heft version: 0.44.5
Node version: v14.19.1

~/nodejs-tutorial-example-rush/domain/board-domain$ ls dist
article
빌드 과정을 보면 컴파일 과정에서 eslint를 실행합니다. eslint 규칙을 위배한 후에 빌드를 하면 규칙에 대한 경고까지 출력이 됩니다. 빌드 이후에
테스트까지 수행하려면 어떻게 해야할까요? heft build && heft test를 입력하면 될까요? 그럴 필요 없이 그냥 heft test만 입력해도 됩니다.
heft 커맨드의 설명서를 보면 아래처럼 나와있습니다.
...
Positional arguments:
  <command>
    clean        Clean the project
    build        Build the project.
    start        Run the local server for the current project
    test         Build the project and run tests.
...
이미 heft test에 빌드 과정이 포함되어 있습니다. ts-jest는 타입스크립트 파일을 컴파일 없이 그대로 입력받아서 테스트를 진행하지만 heft-jest를
수행하려면 타입스크립트를 자바스크립트로 컴파일해야 하기 때문에 테스트 과정에 빌드가 포함되는 것 같습니다. 저는 매번 빌드를 할 때마다 테스트를 실행하기를
선호하기 때문에 package.json의 build 스크립트에서 heft build --clean 대신 heft test --clean을 사용하도록 하겠습니다. 직전에
추가했던 rush test 커맨드는 다시 제거해도 되겠습니다. 나중에 빌드 과정에서 테스트를 제거하고 싶을 때 다시 rush test 커맨드를 추가하면 될 것
같습니다.
app/board-cli/package.json, domain/board-domain/package.json의 "build" 스크립트를 heft build --clean으로 변경하고
app/board-cli/package.json, domain/board-domain/package.json, rig/core-rig/package.json에서 "test" 스크립트를
제거합니다. common/config/rush/command-line.json에서 다시 test 커맨드를 제거합니다.
그리고 rush deploy까지 성공하고 애플리케이션 실행이 잘 되는지 확인합니다.
~/nodejs-tutorial-example-rush/domain/board-domain$ cd ../../
~/nodejs-tutorial-example-rush$ rush clean && rush rebuild && rush deploy --overwrite
~/nodejs-tutorial-example-rush$ node common/deploy/app/board-cli
1) 목록 조회
2) 쓰기
x) 종료

선택:
잘 되는군요.
지금까지 작성한 코드는 nodejs-tutorial-example:chapter-6-build-with-test에서 확인할 수 있습니다.
의존성 버전 통일
ensureConsistentVersion 활성화
Rush 문서에서는 ensureConsistentVersion 옵션을 켜놓기를 권장하고
있습니다. 편한 진행을 위해서 일단은 끄고 튜토리얼을 진행했지만 이제는 켜야 할 때가 온 것 같습니다. 프로젝트 root의 rush.json에서 해당 옵션을 켜줍니다.
// rush.json
{
  ...,
  "ensureConsistentVersions": true,
  ...
}
그리고 rush update를 입력합니다.
~/nodejs-tutorial-example-rush$ rush check

Starting "rush update"

eslint
  ^8.12.0
   - app-board-cli
   - board-domain
   - core-rig
  ^8.11.0
   - preferred versions from common-versions.json

prettier
  2.5.1
   - app-board-cli
   - preferred versions from common-versions.json
  ^2.6.1
   - board-domain

ts-jest
  ^27.1.3
   - app-board-cli
   - preferred versions from common-versions.json
  ^27.1.4
   - board-domain

typescript
  ^4.6.3
   - app-board-cli
   - board-domain
   - core-rig
  ^4.6.2
   - preferred versions from common-versions.json

@typescript-eslint/eslint-plugin
  ^5.18.0
   - core-rig
  ^5.14.0
   - preferred versions from common-versions.json

@typescript-eslint/parser
  ^5.18.0
   - core-rig
  ^5.14.0
   - preferred versions from common-versions.json
이전에 작성했던 common-version.json와 버전이 안 맞아서 경고가 나는군요. common-version.json의 perferredVersions는 특정 의존성을
과거 버전에 고정해야 할 때 사용합니다. 프로젝트간의 의존성 버전을 맞추기 위해서는 ensureConsistentVersion만으로 충분하니
common-version.json의 preferredVersions에 작성했던 버전들을 지워주고 다시 rush update를 합니다.
~/nodejs-tutorial-example-rush$ rush update
Starting "rush update"

prettier
  2.5.1
   - app-board-cli
  ^2.6.1
   - board-domain

ts-jest
  ^27.1.3
   - app-board-cli
  ^27.1.4
   - board-domain

Found 2 mis-matching dependencies!
prettier와 ts-jest의 버전이 맞지 않는군요. prettier는 common/autoinstallers/rush-prettier에서 관리하고 ts-jest는
heft-jest 때문에 필요가 없어졌으니 app/board-cli와 domain/board-domain에서 두 의존성을 모두 지워버리고 rush update를 합니다.
~/nodejs-tutorial-example-rush$ rush update

...
Rush update finished successfully. (2.47 seconds)
잘 되네요. @types/jest도 @types/heft-jest 때문에 필요가 없어졌으니 지워줍니다.
@types/* 의존성 버전 고정
Rush 문서를 보다보면 @types/* 의존성(DefinitelyTyped 프로젝트)에 대해서는
caret(^)이나 tilde(~)를 사용하지 말고 정확한 버전을 지정하라고 합니다. 타입 관련된 것은 빡빡할수록 좋긴 합니다.

--save-exact로 정확한 버전을 명시하도록 한다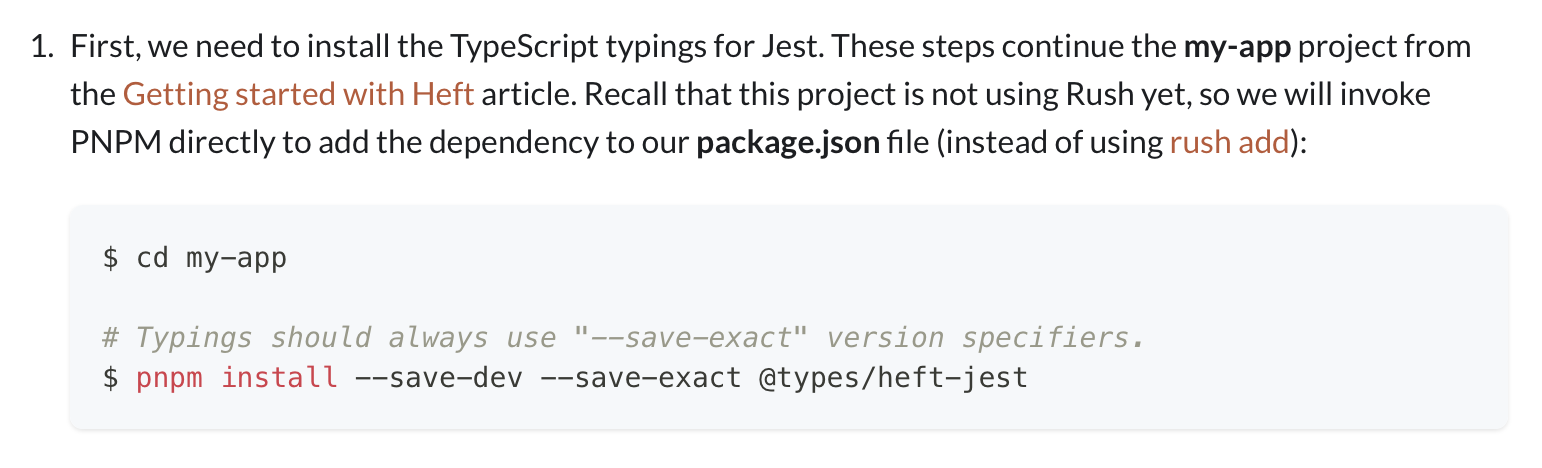
저희는… @types/node만 사용하는군요. caret과 tilde 없이 정확한 버전을 사용하도록 변경합니다. 저는 17.0.23 버전을 사용합니다.
VSCode로 테스트 디버깅하기
heft-jest관련 문서를 보면 VSCode로 테스트를 실행해서 디버깅할 수 있도록 설정하는
부분이 나옵니다. 우리도 해봅시다.
https://github.com/microsoft/rushstack 프로젝트에는 apps 디렉토리 이하에 여러 개의
프로젝트가 있는데요, 프로젝트마다 .vscode/launch.json을 갖습니다. VSCode로 프로젝트를 열 때 모노레포의 root이 아니라 app/board-cli나
domain/board-domain을 직접 열어야 .vscode/launch.json 설정이 적용됩니다.
app/board-cli/.vscode/launch.json과 domain/board-domain/.vscode/launch.json에 아래와 같이 작성합니다.
{
  "version": "0.2.0",
  "configurations": [
    {
      "type": "node",
      "request": "launch",
      "name": "Debug Jest tests",
      "program": "${workspaceFolder}/node_modules/@rushstack/heft/lib/start.js",
      "cwd": "${workspaceFolder}",
      "args": ["--debug", "test", "--clean"],
      "console": "integratedTerminal",
      "sourceMaps": true
    }
  ]
}
그리고 VSCode로 app/board-cli 디렉토리를 열어서 src/index.test.ts에 브레이크 포인트를 찍고 메뉴의 View -> Run을 선택해서 좌측 상단의
초록색 ▷버튼(F5)로 테스트를 실행하면 디버거가 브레이크 포인트에서 멈추는 것을 확인할 수 있습니다.
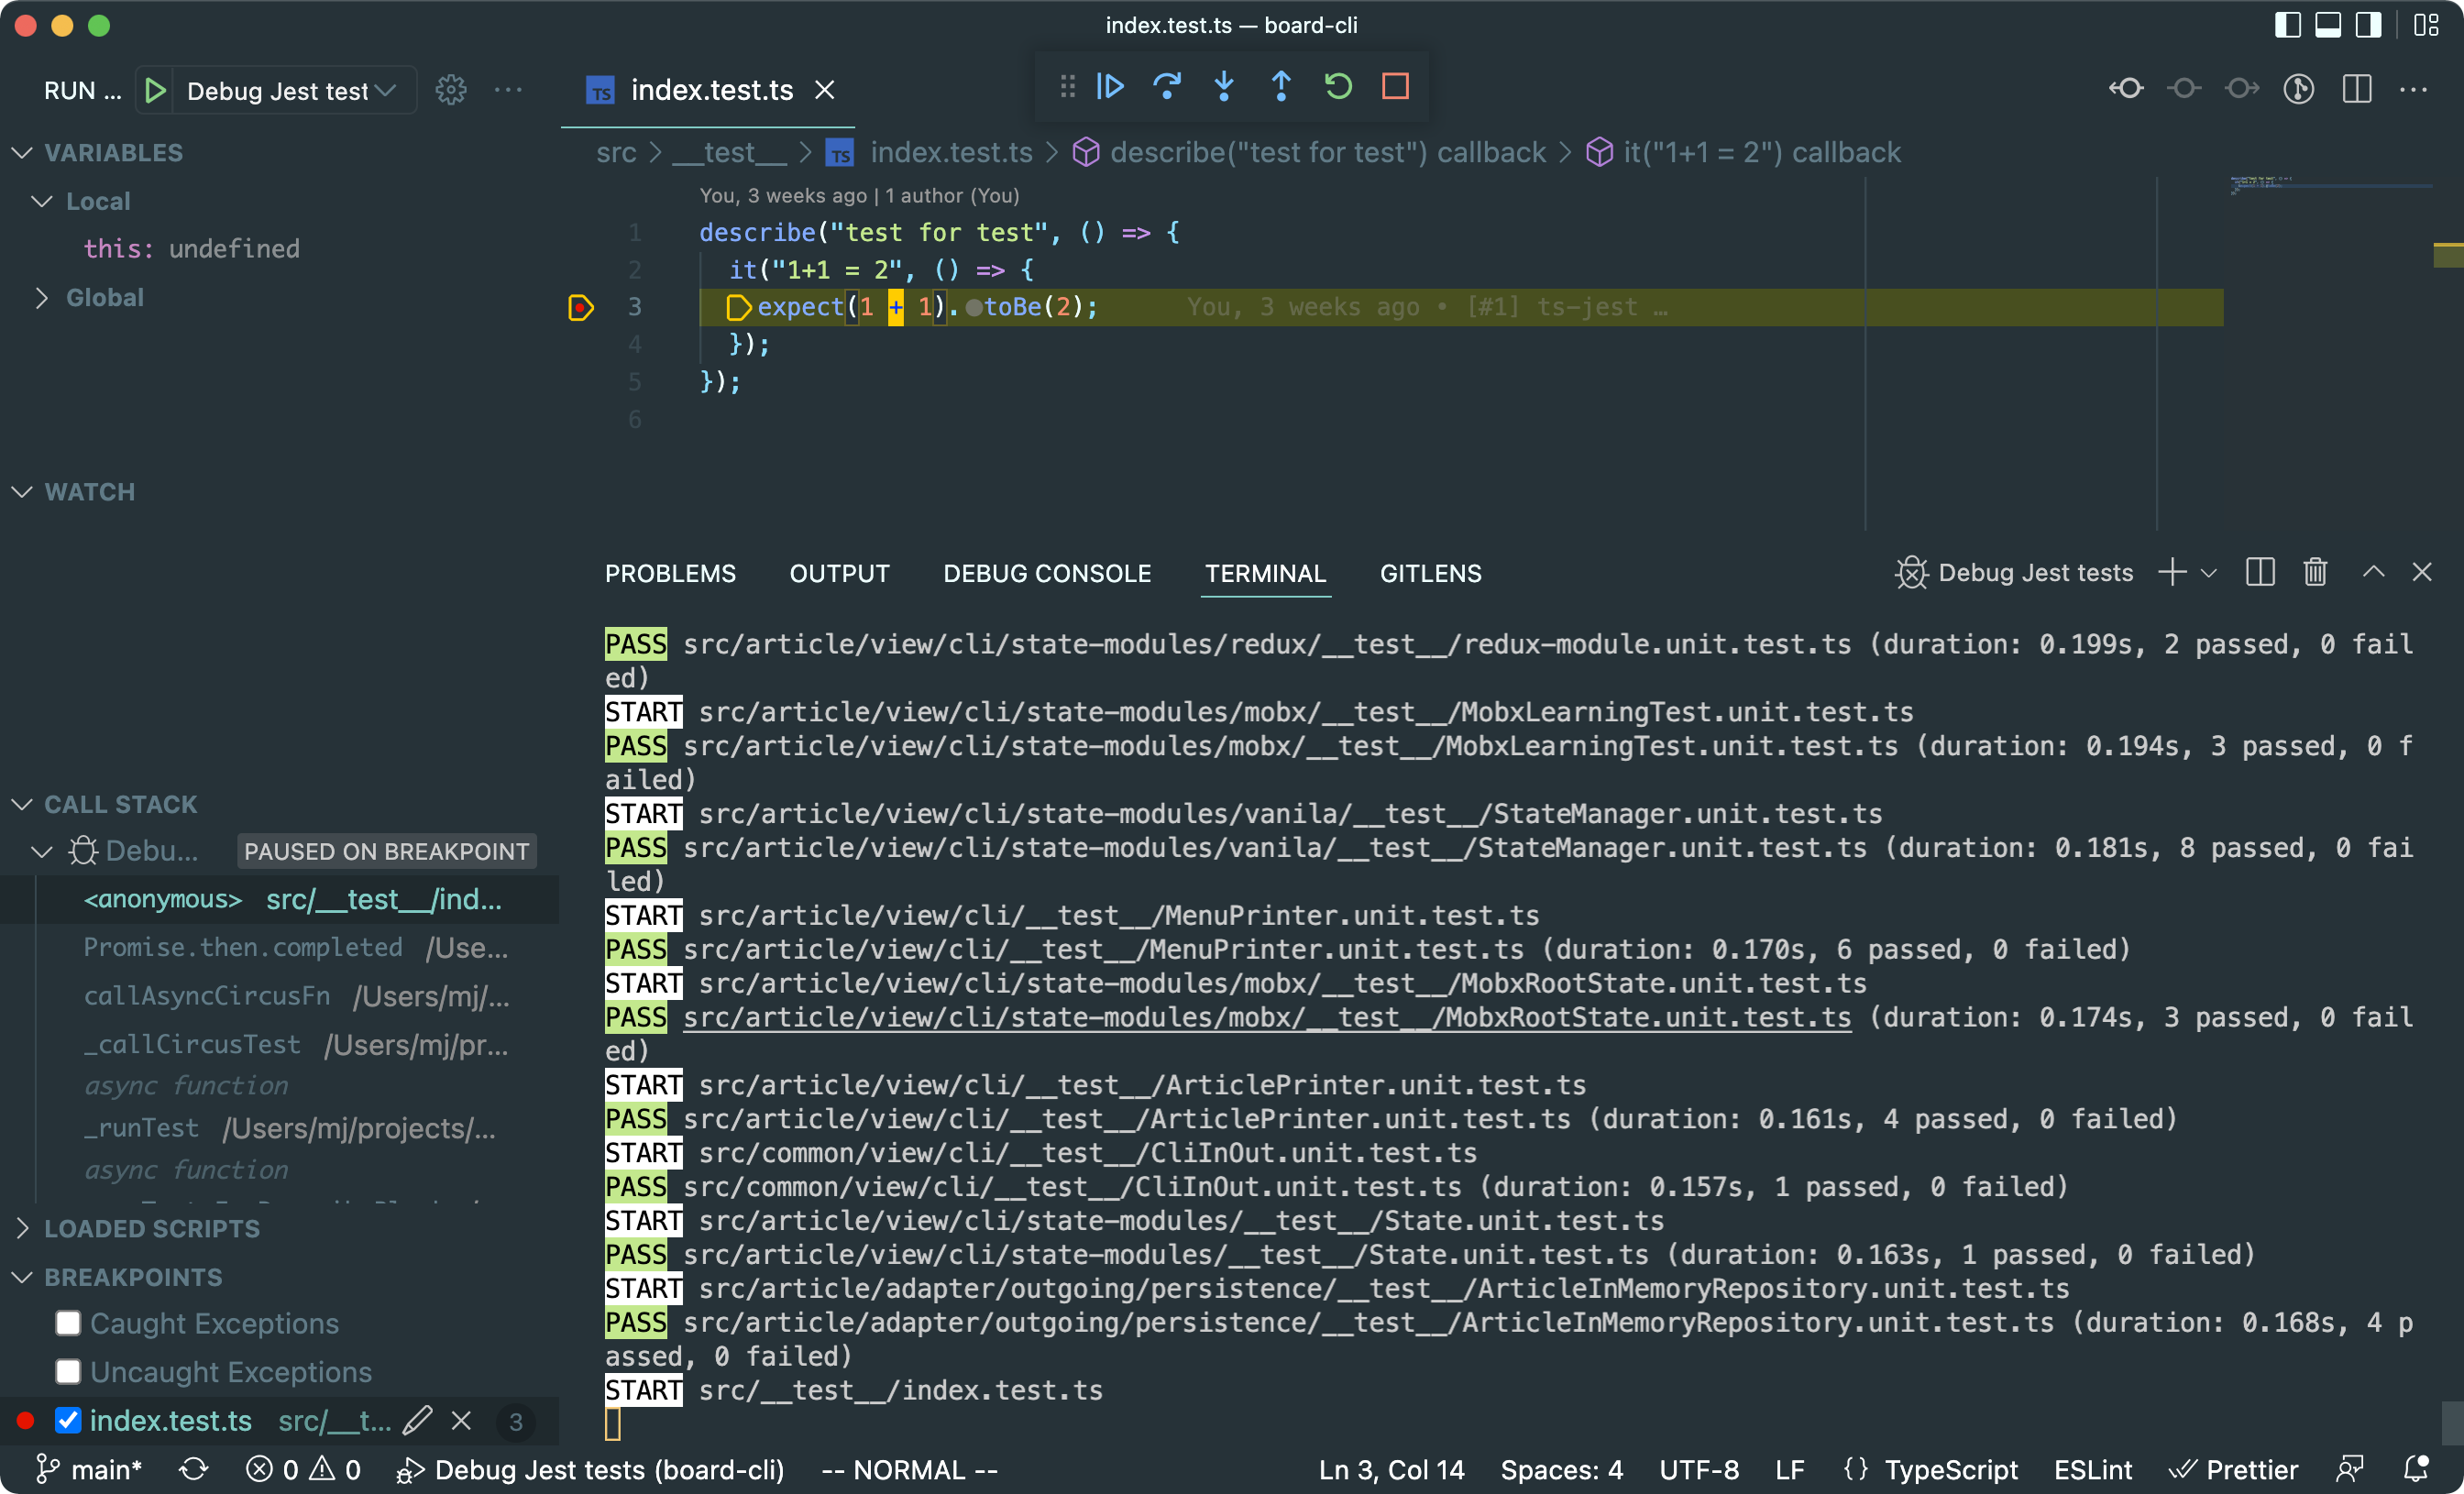
이 상태에서 F5로 테스트를 실행하면 브레이크 포인트에서 테스트가 멈춘다.
Rush Stack 권장 eslint 설정 사용
@rushstack/eslint-config은 대규모 모노레포를 위한 eslint 설정
모음집입니다. 링크의 Philosophy와 Implementation은 꼭 읽어보세요!
.eslintrc.js에서 extends할 수 있는 플러그인 목록은 아래와 같습니다. Profile은 하나만 상속하고 필요에 따라 여러 개의 Mixins를
선택해서 상속할 수 있습니다.
- Profile
@rushstack/eslint-config/profile/node- 기본. 제일 빡빡한 설정입니다.
@rushstack/eslint-config/profile/node-trusted-tool- 기본 설정보다 덜 빡빡합니다. 외부로 공개되지 않는 상황에서만 사용합니다.
@rushstack/eslint-config/profile/web-app- 웹 브라우저 관련 취약점을 예방하기 위한 규칙이 포함되어 있습니다. Node.js와 웹 브라우저에서 모두 실행되는 프로젝트인 경우에도 선택합니다.
- Mixins
@rushstack/eslint-config/mixins/friendly-locals- 로컬 변수에도 타입을 명시하도록 강제합니다.
@rushstack/eslint-config/mixins/packlets- 모노레포의 프로젝트로 분리하지는 않으면서도 하나의 프로젝트 안에서 엄격한
import정책을 설정하기 위해 사용합니다.@rushstack/eslint-plugin-packlets를 참고하세요
- 모노레포의 프로젝트로 분리하지는 않으면서도 하나의 프로젝트 안에서 엄격한
@rushstack/eslint-config/mixins/tsdoc- 주석이 TSDoc 표준을 지키도록 강제합니다. API Extractor같은 툴을 사용할 때 도움이 됩니다.
@rushstack/eslint-config/mixins/react- 리액트를 사용할 때 추가합니다.
뷔페에 온 느낌이네요. 기본 Profile인 @rushstack/eslint-config/profile/node과
@rushstack/eslint-config/mixins/friendly-locals 믹스인을 선택해서 상속해보겠습니다.
rig/core-rig 프로젝트로 이동해서 @rushstack/eslint-config 의존성을 추가합니다.
~/nodejs-tutorial-example-rush$ cd rig/core-rig
~/nodejs-tutorial-example-rush/rig/core-rig$ rush add -p @rushstack/eslint-config --dev --caret
rig/core-rig/profiles/default/.eslintrc.js의 "extends" 속성에 @rushstack/eslint-config/profile/node과
@rushstack/eslint-config/mixins/friendly-locals를 추가합니다.
// rig/core-rig/profiles/default/.eslintrc.js
module.exports = {
  root: true,
  parser: "@typescript-eslint/parser",
  plugins: ["@typescript-eslint"],
  extends: [
    "eslint:recommended",
    "plugin:@typescript-eslint/recommended",
    "prettier",
    "@rushstack/eslint-config/profile/node",
    "@rushstack/eslint-config/mixins/friendly-locals"
  ],
};
rush build를 입력하면 아래와 같이 에러가 발생합니다.
~/nodejs-tutorial-example-rush/rig/core-rig$ rush build

...
--[ FAILURE: board-domain ]----------------------------------[ 3.55 seconds ]--

Error: Plugin "@typescript-eslint" was conflicted between
"--config » ./node_modules/core-rig/profiles/default/.eslintrc » @rushstack/eslint-config/profile/node" and
"--config » ./node_modules/core-rig/profiles/default/.eslintrc » plugin:@typescript-eslint/recommended » ./configs/base".

Operations failed.
@rushstack/eslint-config/profile/node가 이미 @typescript-eslint를 내부에서 사용하고 있어서 @typescript-eslint와 충돌이 있습니다.
.eslintrc.js에서 @typescript-eslint 관련 설정을 제거하고 git의 pre-commit hook 덕분에 필요없어진 "perttier"도 제거합니다.
@rushstack/eslint-config/profile/node이 충분히 고난을 가져다 줄 것 같으니 문서에 나와있는 것처럼 eslint:recommended도 제거하고
@rushstack/eslint-config/profile/node, @rushstack/eslint-config/mixins/friendly-locals 만 남겨봅시다…
// rig/core-rig/profiles/default/.eslintrc.js
module.exports = {
  root: true,
  extends: [
    "@rushstack/eslint-config/profile/node",
    "@rushstack/eslint-config/mixins/friendly-locals"
  ],
};
rig/core-rig/package.json에서 필요없어진 @typescript-eslint/eslint-plugin, @typescript-eslint/parser,
eslint-config-prettier를 제거하고 rush update를 한 뒤에 rush build를 실행합니다.
~/nodejs-tutorial-example-rush/rig/core-rig$ rush update
~/nodejs-tutorial-example-rush/rig/core-rig$ rush build
...
  [eslint] src/index.ts:11:1 - (@typescript-eslint/no-floating-promises) Promises must be awaited, end with a call to .catch, end with a call to .then with a rejection handler or be explicitly marked as ignored with the `void` operator.


Operations failed.
세상에… 다 적을 수 없지만 2억개 정도 경고와 에러가 발생했습니다. 경고는 일단 놔두고 에러라도 처리해야 할 것 같네요. 다행히 에러 종류는
no-floating-promises
밖에 없어서 void operator를
사용하는 방식으로 해결했습니다: https://github.com/myeongjae-kim/nodejs-tutorial-example/commit/2ffa40a6c94faf01ea05634db98f19c97108ebb7
// rig/core-rig/profiles/default/.eslintrc.js
module.exports = {
  root: true,
  extends: [
    "@rushstack/eslint-config/profile/node",
    "@rushstack/eslint-config/mixins/friendly-locals",
  ],
  rules: {
    "no-void": ["error", { allowAsStatement: true }],
  },
};
~/nodejs-tutorial-example-rush/rig/core-rig$ rush build

...
Operations succeeded with warnings.
이제 경고가 1억개정도 남아있습니다. rush build는 eslint 경고가 발생하지만 성공하긴 합니다. rush deploy --overwrite까지 해서 배포용
빌드도 실행이 잘 되는것을 확인했습니다.
~/nodejs-tutorial-example-rush/rig/core-rig$ cd ../../
~/nodejs-tutorial-example-rush$ rush deploy --overwrite

...
The operation completed successfully.
~/nodejs-tutorial-example-rush$ common/deploy/app/board-cli
1) 목록 조회
2) 쓰기
x) 종료

선택:
지금까지 작성한 코드는 nodejs-tutorial-example:chapter-6-done에서 확인할 수 있습니다.
험난한 모노레포의 길
프로젝트 구성하면서 설정에 실패하고 문제를 해결하는 과정까지 모두 자세하게 담았습니다. 생각보다 글이 길어졌지만 어느정도 만족스러운 모노레포를 구성할 수 있어서 기분이 좋습니다.
게시판을 넘어서는 새로운 도메인이 필요하다면 domain 디렉토리 이하에 프로젝트를 추가합니다. 새로운 애플리케이션이 필요하다면 app이하에 프로젝트를
추가합니다. 새로운 설정용 프로젝트가 필요하다면 rig이하에 rig package 역할의 프로젝트를 추가하면 됩니다. 이 3가지의 구분 외에도 다양한 레이어가
만들어질 수 있습니다. Remote 요청을 보내는 client/xxx-client 프로젝트라든지, 데이터베이스나 캐시같은 외부 의존성을 위한 infrastructure
라든지… (멀티모듈 설계 이야기 with Spring, Gradle)
Rush는 대규모 모노레포를 관리하기 위해 프로젝트 디렉토리의 깊이를 제한하거나 의존성 추가를 승인받는 정책을 설정하는 기능도 제공합니다. 일관성있게 관리하면서 중복을 제거한다면 모노레포는 엄청난 크기로 커지면서도 일정 수준의 복잡도를 유지할 수 있게 됩니다.
Lerna는 ‘뼈대만 제공할 테니 나머지는 알아서 하라’는 느낌이었다면, Rush는 ‘우리가 해보니까 이런게 필요하더라 그래서 준비해뒀어’의 느낌이었습니다. 정성대님은 ‘Rush로 프론트엔드 모노레포 도입기’에 ‘오픈소스 저장소가 아닌 애플리케이션용 저장소를 위해서는 Lerna보다 Rush가 낫다’고 했는데 그 말에 충분히 공감을 합니다.
모노레포의 길은 쉽지 않지만, 소수의 인원이 고생해서 틀을 만들어 놓으면 그 이득은 조직 전체에 복리로 돌아온다고 생각합니다. 도전해보세요 츄라이 츄라이 💪
results matching ""
No results matching ""
